Digital Documents - How to Complete and Send
Document Viewing & Sending Guide
This guide outlines how to view and send documents in the system, either automatically, manually, or without an appointment. If you have a specific use case not covered below, please reach out for further assistance.
Viewing Documents
To view existing documents and templates:
- Click the Tools icon (top-left corner).

- Select Documents and Templates.
- Click View All Documents.
- Go to the Document Templates tab.
- Click the magnifying glass icon next to a document to view its contents.
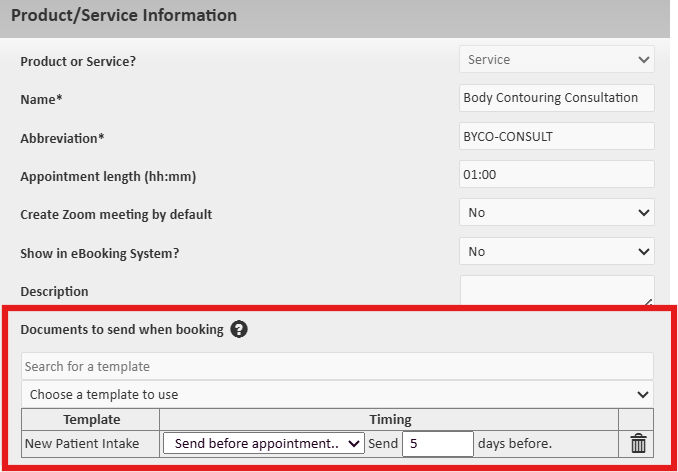
Sending Documents Automatically When an Appointment Is Booked
- Navigate to Inventory > Products & Services.
- Add a new Service by selecting the 'Add a New Product or Service' button, or click the edit (pencil) icon beside an existing service you would like to update.
- In the 'Documents to send when booking' dropdown, select the desired document. (Make sure 'service' is selected for the documents option to appear)
- Set the timing for when the document should be sent (e.g., immediately when service is booked, or before/after the appointment).
- Click Save.
Sending Documents Manually When Booking an Appointment
- While scheduling an appointment, scroll to the 'Documents' section on the form.
- Select a document from the dropdown or begin typing to search.

- Set the timing for when the document should be sent.
- Complete the appointment setup. The document will be sent based on your selected timing.
Sending Documents Without an Appointment
- Go to the Client’s Profile.
- Navigate to the relevant Document tab (e.g., Medical History, Consent Forms, etc.).
- Click Create New… Document Template.
- Select the appropriate PDF template from the dropdown.
- Choose how to send or complete the document:
- Email → Email with Document Link: Sends a link for the client to complete the document online. NOTE: To make changes to the document before emailing, select 'Administration', save changes, and select the magnifying glass beside the saved document in the table (picture below). Select 'Email', then 'Send email with Link'.


- Patient: Allows the client to complete the document in the clinic on a tablet or computer. Use the browser’s back button to return to the system afterward.
- Administration: Staff can fill out the document without logging out of the system.
- Click 'Save' when the document is completed
All completed documents appear on the client's profile, in the table under the corresponding tab. To view or edit existing documents, select the magnifying glass beside the document.
Article Number: 76
Author: Jun 10, 2025
Last Updated: Oct 6, 2025
Online URL: https://help.wyliebiz.com/article.php?id=76